
Monday, December 31, 2012
Well today we lofted up most of the parts for the wind vane and the middle sections of the beams. I spent the afternoon climbing, so we didn't get too much done. Tomorrow we are going to cut everything and get it sanded down to precise size. We hope to get to cut the stiffeners for the starboard hull as well. There wasn't really anything to take pictures of today except for a bunch of lines on sheets of plywood. Tomorrow I'll take pictures of everything once it's cut out. In the meantime, here's a picture of what the (hopefully) near future will hold for us. This is my friend Brandon Gamble's Tiki, Element. Thanks Brandon for all of your hospitality on our trips to sail Element!

Saturday, December 29, 2012


Wednesday, December 26, 2012
We have been working at a decent rate over Christmas break. I have been doing all of the bulkhead fillets for my (port) hull. These fillets seem to take forever, but I think I finally have my system tuned well enough to avoid the rage and frustration that was felt earlier on. The fillet mixture is like peanut butter and it sticks to everything and drips and goes everywhere! Now that I have figured out how to keep this most unsavory mixture under control, my progress with each is seemingly more efficient. I only have eight more to do tomorrow! Grace has been getting her bulkheads ready to go in, and we should be able to stitch them in tomorrow. We have her hull stitched and hanging, and we also rearranged the hulls so that port is on the left and starboard on the right side of the garage. Before I had my port hull over on the right. When moving my hull, we were both surprised at how lightweight it still is. The plans say that a complete hull should weigh in at around 175 pounds. We also went on an overnight sail on Sunday night with our Montgomery 15. We had the lake to ourselves, and it only got down to around forty degrees. The Montgomery is a fine vessel, but it's slow monohull speed had us dreaming of our future with the Tiki.


Anchor locker fillets

Fillets

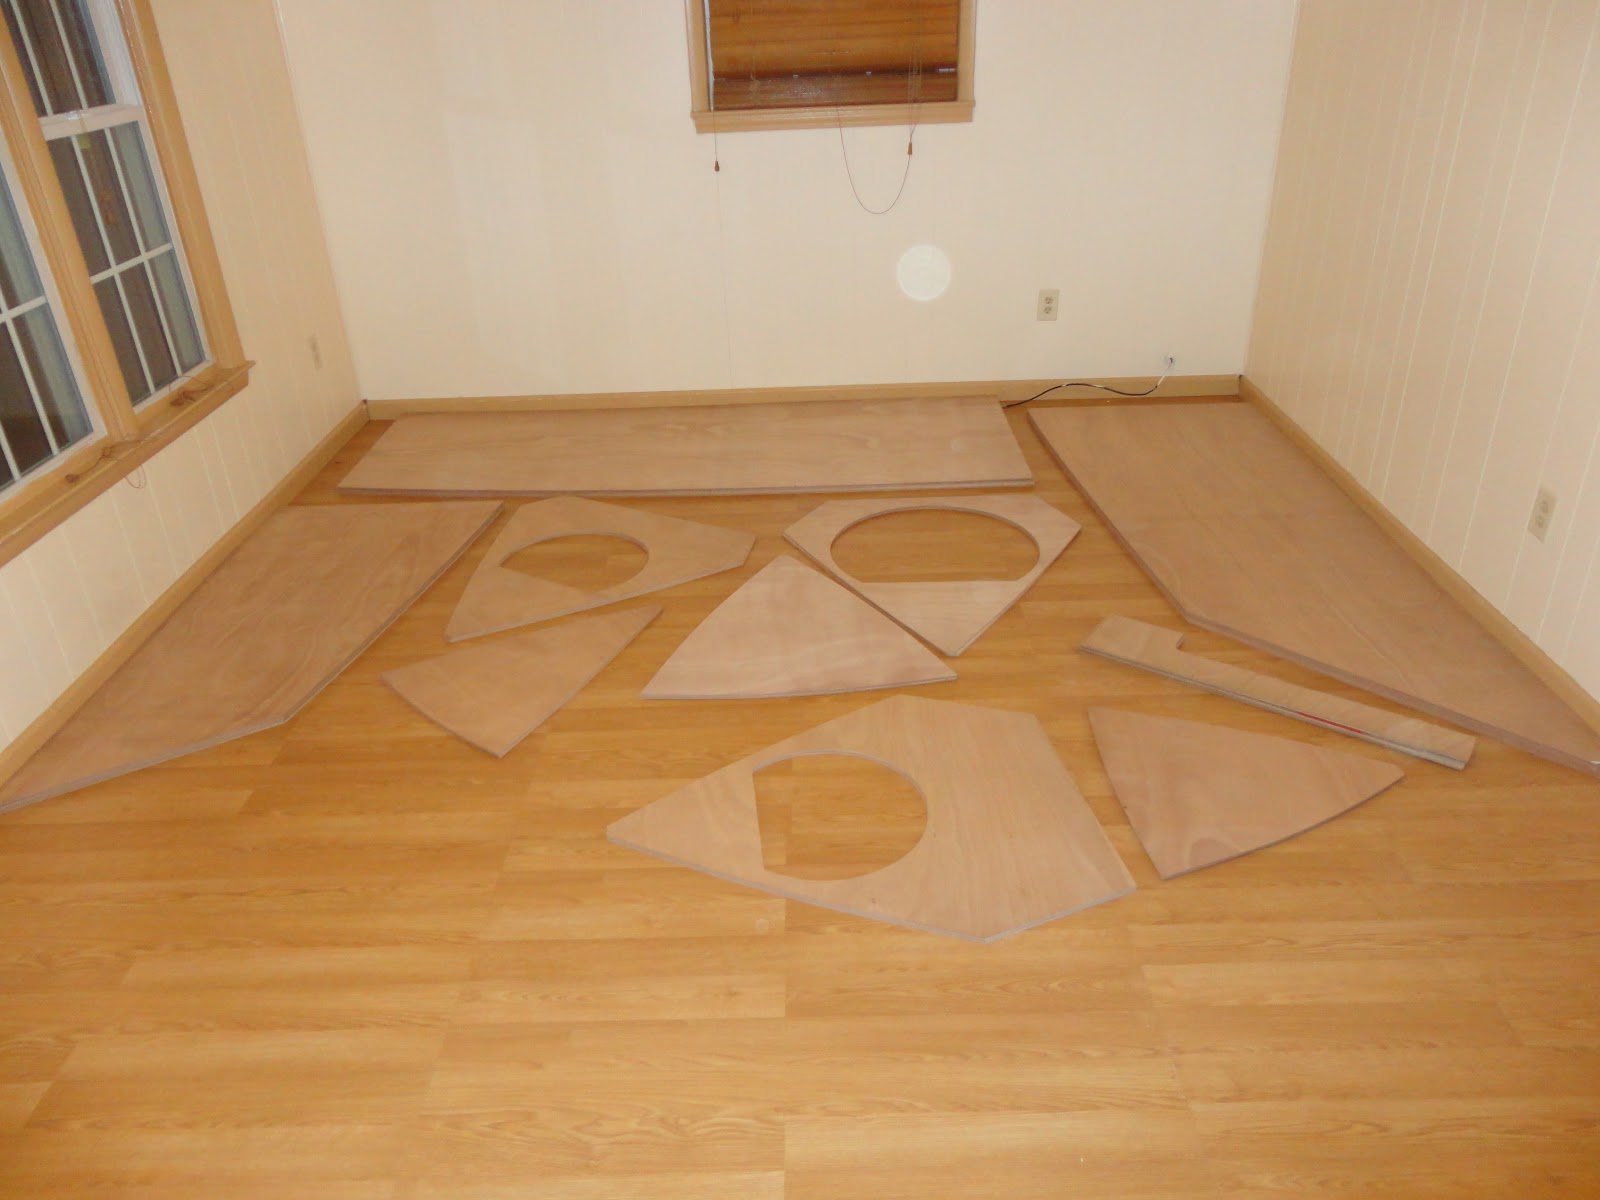
The second hull is ready for it's bulkheads

Thursday, December 13, 2012
Working on Hull 2
I had to go out of town last week for some work, so the boat didn't really get any attention. This week, however, I have gotten back to working pretty conisistently. The goal for this week is to get my port hull filleted and to go 3D with the starboard hull. We glued up the sheerstringers for the second hull, and I am making the keel today. I also added the backing pads for the front beam and the shroud pads to the port hull. The stem and skeg are already shaped and sanded, so once I get the keel done I can stitch up the hull. The bulkheads always seem to take so much work between the gluing of bunk and deck braces, coating, sanding, etc. The only thing holding me back with these is the pre-notched deck braces. These are fitted on the forward and aft side of the cabin section. All of the other braces are flush with the top of the bulkheads, so I only have to cut the excess and belt sand them flush along the curve. However, these pre-shaped braces have to be, well, pre-shaped and notched before being glued on. I don't know why I hate making these so much. It's a toss up between using the table saw and making pre-notched deck braces. On a lighter note, our mast arrived last week, and I must say that a mast failure seems completely improbable. This beefy piece of aluminum has a 4" outer diameter with 1/8" thick walls. All we have to do is cut 2.5' off of the tube and get a plate welded on top with a tang fore and aft for main and spinnaker halyards. Our main sail is a "wing sail" designed by Wharram. It uses no track and has a sleeve that wraps around the whole mast. Anyways, here are some pictures...


 Endless Stirring!

Backing pads. The forward compartment there is for sealed buoyancy, and the hole will be fitted with a 6" diameter inspection/deck plate.

Once again, the mast is burly


Thursday, November 29, 2012
I spent a very very long time working on the keel fillets. You have to make a lightweight mix first that sinks down into all the cracks. Then, you fill multiple times until you have around a 1/2" layer over the keel. In the morning, I'll put the last layer in, make it a nice pretty fillet, and then apply the glass cloth over it. Grace helped mix epoxy tonight, so we could have one ready after the other. It saved a lot of time. We also got our ventilation hatches in. These will go on the cabin top, forward of the dodger, and they will allow nice airflow through the bunk area. They are Lewmar Low Profile hatches.


We bought Bill Belcher's book on Wind Vanes. It is out of print, so it was a little expensive. However, it will allow us to build a sweet vane that will allow us many hours of not touching the tiller!
Monday, November 26, 2012
Today I worked on the port hull, taking all of the wire clamps out and cleaning it up. It is now ready to begin filleting in the keel tomorrow. I've got everything lined up and the wires and screws are holding it nice and tight. I used screws in the skeg area to get the sides completely flush. It is a PITA trying to get the wires tight enough (they break). I also glued up the starboard side of the starboard hull tonight. I'll glue up the port side in the morning. I want to have the port hull stitched by the weekend, but we'll see how hard I work! I still have to finish out all of the starboard bulkheads.
P.S. Shopvacs are the best tool in the garage

P.S. Shopvacs are the best tool in the garage

Friday, November 23, 2012
Diagonal Stiffeners
Today I got all of the diagonal stiffeners and the cabin and deck support beams cut. I ended up beefing up all of the parts for more strength. I will have a picture below with the standard triangular shape that the plans call for and one with the size I am going to use. Tomorrow I'm going to start with the hull assembly process for the starboard hull. I will also glue on the stiffeners in the morning. They are all prepped and ready to go in. After the stiffeners are in, I can finally start the fillets for the keel and bulkheads.


These are still rough cut. I will sand them and make them all pretty before they go in for good.

The size the plans call for and the beefier size used.

I got inside to check it out. I'm definitely sleeping inside once I get the bunks in.

Diagonal stiffeners are prepped and ready to be glued in place in the morning.
Monday, November 12, 2012
Bulkheads Stitched
So we finally have something that resembles a boat in the garage! I kind of had a few weeks of not doing much with the boat (climbing too much). Now that it finally looks like a boat, though, my motivation has returned in full. Here are some pictures of everything. I still have to clean up the garage and finish tightening everything down (especially the stern section). The power went out earlier, and I had to do most of the work by headlamp. It finally came back on right when I finished, of course.


The white is just epoxy dust from sanding. I haven't taken the time to wipe it down yet.

The deep V shape of the hull provides lateral resistance without the need for daggerboards. I am eventually going to add some skids that are about 4" deep along the keel for beaching and drying out. These skids will also add more lateral resistance for going to weather. These will be made of hardwood and will provide a sacrificial layer for wear. The front and rear cavities are the built in flotation chambers that keep the boat afloat in case of being holed. I'm probably going to fill these chambers with empty bottles in case they themselves become holed.
Tuesday, October 23, 2012
Bulkhead Work
Today I glued up the deck and cabin top braces to the bulkheads. I also cut out a bunch of other stuff for the other hull. Tomorrow I plan on coating each bulkhead with two coats of epoxy. I experimented with adding some designs to the bulkheads. The sun pictured below was added to the bulkhead that splits my bunk in two. I am thinking about possibly putting a sailing quote or two on another bulkhead. Who knows. I like having a little bit of personalization to my hull. We are going to varnish inside the cabin, so it will shine through pretty well, I hope!


Saturday, October 20, 2012
First Hull is Stitched!
Today Grace and I got the first hull stitched together. It took a little bit longer than expected, but it was well worth it. I'm going to finish the bulkheads on Monday/Tuesday, and then we will be able to finally stitch them all into place. Finally seeing the flat panels expand was a really nice reward today. We left some of the stitches a bit loose, as can be seen in the pictures. Those will be getting tightened up, but for now it's off to Texas Roadhouse for some food!


Wednesday, October 17, 2012
Back to Work
Well I have glued up the keel and sheerstringers for hull 1. All of the butt blocks are double coated now as well. I plan on gluing up one of the sheerstringers to the hull panel today. Hopefully we can go 3D with the hull tomorrow afternoon. It's about time!
Saturday, October 6, 2012
Vacation
Well we haven't updated the blog, because we have been on vacation. Grace has two weeks off of work. We spent the first half of this week sailing Brandon Gamble's tiki 21, Element. Camping out on her provided us a lot of new ideas for our own boat's customization. We had a great time there. Thanks, Brandon!
Thursday, September 20, 2012
Hull Panels
Got the first set of hull panels joined up. I'm going to glue up the next set in a few hours. Today will also see the planing and gluing of sheerstringers. I will post some more pictures later on tonight.


Tuesday, September 18, 2012
Progressing Still
So now I have all of the bunk braces installed on the bulkheads. We are now shifting focus to the hull panels, sheerstringers, keel, stem, and skegs. Now that I have listed it, it sounds like a lot of work! Anyways, we built a box on which to assemble the hull panels, because our garage isn't a flat, level surface. In the morning I will be gluing up the first hull panel. My father-in-law is coming into town on Friday, so we really want to have the hulls stitched up for him to check out. Hopefully if we crack down and work hard we can get the hulls to that point. Grace also bought me the Gill OS2 Smock for my birthday, which I'm pretty stoked about.


The seal factor on this jacket is insane. Sealable neck, cuffs, and waist. It's basically
a paddling dry-top but much more burly.
Thursday, September 13, 2012
Bunks and Stuff
Today we are getting the bunk bearers glued onto the bulkheads. We are about to go climb, but afterwards we will be picking up a bunch more clamps and some good masks. It is impossible to have too many clamps in this business. IMPOSSIBLE. Anyways, here are some pictures of the work done today.
Ready to be Glued

Ready to be Glued

This is Grace Showcasing a Finished Bunk Bearer
Monday, September 10, 2012
More Coating
Today I got all of the bunkbearers measured out and cut. Then, we epoxy coated each middle hull panel with two coats. We ended up spending a lot of time at the climbing gym, so we didn't do as much as we thought. Tomorrow I will start gluing the bunkbearers to the bulkheads, and pictures will follow.
Sunday, September 9, 2012
Working Again
Today we went and picked up all of the lumber for the bunkbearers, deckstringers, sheerstringers, and keel. I will begin getting it all down to size tomorrow and fitting these parts to the bulkheads. Today we got all of the bulkhead lines marked on all of the hull panels. Then we sanded the panels down and used a brush to wipe off all of the shavings. We then brought the panels inside to the nice climate controlled "epoxy room" and got two coats on most of the panels. We ran out of room on the middle section panels, so they will get coated tomorrow. It feels good to be working again, and it feels really good to actually have some help! We watched Thomas Nielsen's video on spreading epoxy, and we followed his tactics. I spread the epoxy out with a window squeegee (we are going to get a smaller one; the big one didn't bend very well) while Grace followed behind with a foam roller, smoothing everything out. Once we got our system down, it went really quickly.


Getting ready to sand. Don't worry, the OSB is NOT for the tiki!

Epoxy really makes the wood look good. It will be interesting to see how some varnish adds to it later on.

Wednesday, September 5, 2012
Update
For anyone following the blog, my wife gets back tomorrow from Afghanistan. Work will start back up on Friday/Saturday on the boat, and the work will be consistent from then on. I'm eager to get back to work, for sure.
Friday, August 24, 2012
Progress
Well I have slowed down a lot, as per my wife's request, but I'm still creeping along. I got all of the hull panels sanded down to the line. Now, all that I'm waiting on is the sheerstringers, keels, stems, and sternposts. I should be able to cut all of these fairly quickly. Tomorrow I will be picking up and cutting the lumber for the sheerstringers and keels. I got a sweet circular saw off of Craigslist last week for ripping. Monday, I plan on picking up the sheet of 18mm ply for my stems and sternposts. Our epoxy is also scheduled to arrive early next week. I decided to go with Raka epoxy out of Florida after talking to several other Tiki owners who have used it with good results. If all goes well, I should have everything ready for stitching by the end of next week. I may wait to stitch it all up until Grace gets back, but I am for sure waiting on her to push in the bulkheads. That step, in my mind, is sort of a monumental step in the build. You get to see everything in 3D for the first time, and it should serve as a great justification of all the work I have been doing with a bunch of flat pieces of plywood. Once she gets back, we will be working much harder than I am now, so the blog won't be as sluggish.

Saturday, August 18, 2012
Still Cutting
I have been cutting a lot. The hull panels and bulkheads alone equal up to twelve full sheets of plywood. That's a lot of jigsaw and belt sander use. Today I got the holes for the bunk area cut into all of the bulkheads (6 total). The other three bulkheads will remain solid. The Tiki 21 has buoyancy chambers in the bow and stern of each hull. This makes the boat "unsinkable". At least if the main cabin fills with water, or we capsize, these chambers should keep us afloat. There is another storage area forward of the bunk that is accessable from outside the hull. This provides another sealed area in the case of a hole in the boat. Basically, each hull is a giant sea kayak. I finished sanding all four bow panels down to the pencil line as well today. All I have to do tomorrow is sand three middle and three stern sections down. Then I can move on to the stem, sternpost, keel, and sheerstringers............then I can stitch it all up and see what this boat is going to look like for real.
This is the way I drew out the curves for the hole in each bulkhead. I measured the distance on the ply strip first. Then hammered it into the bulkhead. Then used the other nail as a pencil to mark the line.

Here are the holes for the bunk sections. Bulkheads are in line with each other in the picture.

This is the way I drew out the curves for the hole in each bulkhead. I measured the distance on the ply strip first. Then hammered it into the bulkhead. Then used the other nail as a pencil to mark the line.


Friday, August 17, 2012
More Cutting
Today I took the belt sander to all of the cut out parts and sanded down to the pencil line on all of them. This took a while. I then got the midde and stern sections cut out as well as the last bulkhead. Now I have templates for everything. I no longer have to loft the lines onto the plywood. I can just use the templates as a guide. This will be MUCH faster, and I plan to have all of the bulkheads and hull panels cut out by tomorrow. That way I can start working on the keel and sheerstringers. I have to go pick up a sheet of 18mm ply for the stem, sternpost, and rudders. Anyways, here are the pics...............
I can finally get a feel for the size


I can finally get a feel for the size

Everything lines up well!

The bulkheads (minus one) The stock plans call for a three inch drop from the inboard to outboard edge of the top of the bulkheads. I am pretty tall, so I changed this to a one inch drop instead. It will give Grace and me a little more room without altering the lines of the boat too much. Every bit of room counts in a Tiki 21. Tomorrow I will cut the holes for the bunks out of the middle three bulkheads pictured here.

Thursday, August 16, 2012
Cutting hull parts
Well this morning I ended up running errands for the house. I then got very hot due to the fact that my truck has no a/c. As a result, I spent most of the day at the river swimming around and hanging out. I got a few hours in tonight after I got back, but I stopped cutting around eight o'clock. I don't want to be that guy in the neighborhood keeping everyone up with power tools all night. I got one bow section cut, three out of four butt blocks, and five out of six bulkheads. I cut right outside the line, and tomorrow I will use a belt sander to smooth down all of the cuts right to the pencil line. I also remeasured everything once again before cutting. I measured in five inch increments from the middle of the curve on the bulkheads to make sure both sides were even. I then checked these measurements against the other side of the bulkhead to check for symmetry. I also cut pretty far outside the lines so that I can (safely) get a feel for how aggressive the belt sander is. My wife is returning soon, so I'm getting pretty stoked to have a good bit of work done for her to see upon arrival. I'm also stoked to see her, of course!
 My buddy ended up with obligations tomorrow, so I ended up using a wooden batten bent around nails to draw out the curves of the bulkheads and the hull.

 There's no better way to end the day than a big ole half gallon of Tang.


Wednesday, August 15, 2012
Lofting
I finished lofting up the hull panels, butt blocks, and bulkheads yesterday afternoon. The use of a giant square made things go pretty smoothly. I need to stop being so particular on measuring everything out ten times. Three or four checks should be more than plenty! My wife is deployed right now, so I have a buddy coming over tomorrow to help hold the batten for drawing out the smooth curves of the hulls and bulkheads.
My lofting room

My lofting room


I found this extra crisp Asym Spinnaker from an old boat of mine in storage. The luff is 22', which should work with the Tiki. Free Kite=Sweet

This is my workshop area. It feels strange to me to be renting a full size house, but all of the climate controlled workspace is a great justification! The garage is 23' deep and around 16' wide. This means I can build both hulls at the same time, which should cut down on build time (hopefully).
Subscribe to:
Posts (Atom)